Video:
Instructions:
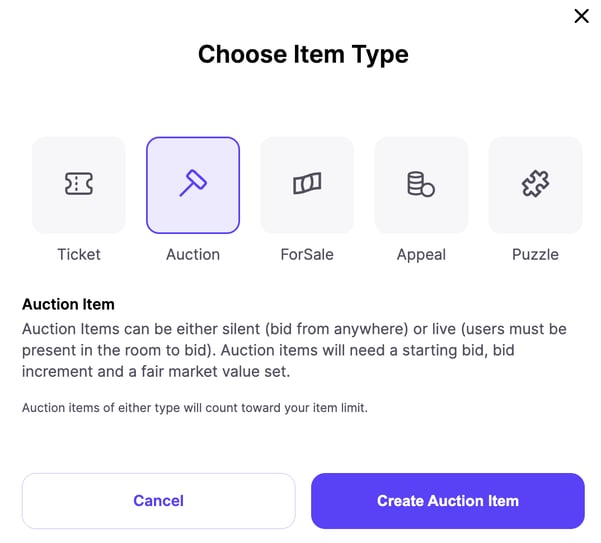
- To add an item to your auction, go to your auction dashboard.
- Select the Add Item icon at the top of the screen

- Select the gavel icon for Auction items in order to begin.
- Fill out the appropriate information in the create new item form. Please note RED boxes are required fields.
ITEM INFO Tab Settings:
- Item Name - The item name is what bidders are going to use to recognize an item. Make your item name descriptive, unique and not too long (max length is 54 characters). If you have two identical items, use something such as a number or letter in the name to distinguish between the two.
- Item Code - Item code is a unique value that you assign to each item. This can be a combination of letters and numbers and is used to help you organize your physical items. (if you use the item upload template, an item code is required. Duplicate item codes will override your item names - pay attention!)
- Auction Type - This can be a silent auction item with one winner and bids placed by bidders on the mobile app, iPads or the web. Or, you can designate it as a live auction item which will be visible to bidders, but they will not be able to bid on the item. If you make it a live auction item, you (as the auction manager) will have to place winning bids through the backend system.
- Market Value - The estimated dollar value of the item. It is important that you provide estimated values on items for tax purposes. The value is shown on the receipt as Fair Market Value. There is a lot of debate about how to properly set market values on items. We will provide you with guidance and advice only. Ultimately it is up to you to determine how you want to communicate Fair Market Value to bidders. If you want to hide the value, there is also an option for that. This will be discussed later.
- Starting Price -The starting bid price for the item. Please only put in a positive integer here, no $ symbols or numbers with decimals. For a live auction item this price is less important (because you will enter the winning bid at the end). Enter in the price you feel the bidding should end at not start at. This will give the bidders some sense of value for the item. Even though this will not be bid on by the app, you still need the price - if you are unsure set the price to $1.
- Bid Increment - The dollar value of each incremental bid on the item. If you leave this blank the system will default to $1. (All Live auction items have a bid increment of $1). Please only put in a positive integer here, no $ symbols or numbers with decimals. Want to read more about Bid Increments? Check out our blog on it.
- Reserve price - This is a HIDDEN amount the bidder cannot see. This is the minimum amount the auction item would sell for.
- Buy Now Price - This allows you to establish a set price a bidder can buy an item for instead of bidding. If someone purchases an item for the Buy Now Price the item will be displayed as SOLD OUT in the auction. NOTE: If you have a Buy Now price on an item, the bidder cannot bid or place a max bid above the Buy Now price. Once bidding gets to the Buy Now price the item will automatically be sold. This must be left blank for a live auction item.
- Show Value - If this box is checked the Fair Market value will be displayed in the app and on the website. Even if this box is NOT checked, the market value will be displayed on the winning bidders invoice as Fair Market Value. When would you want to hide the value? If you have an item that has a low fair market value (class project or parking space), you can put that low value in here, but then hide it from bidders so that they are encouraged to pay a higher price for it.
- Item Category - Each item is assigned to a user-defined category. All items must be placed in a category to show up in the Handbid iPad app, iPhone and Android app. You can create categories by selecting the "+ add" link next to the category title.
- Status - This will default to pending regardless of what you set here for new items. This is to prevent items from being pushed to the mobile app until you are ready. if your auction is not yet open, you don't need to do anything here. However, if your auction is already open you will need to come back in and change this to "open" once you create your item. You can safely ignore the other item status options in the list!
- Tax Against - This option will allow you to calculate tax at an item level based on either the market value or the winning bid. We recommend you consult with a tax advisor prior to setting any tax levels on items.
- Tax Rate - This is the tax rate (as a percentage) that you want to set on the item. we recommend you consult with a tax advisor prior to setting any tax levels on items.
Note: If you applied tax using the premium amount in the auction setting you do NOT need to add tax to each item.
- Is Hidden - If this box is checked your item will be hidden from bidders. You cannot hide an item with bids or purchases on it. You may want to hide an item when you don't have all of the components or perhaps the donor has not confirmed they will provide it. You can set up the item and hide it so potential bidders will not see it. When you are ready to show it to bidders, simply un-check this box.
NOTE: Important Information
When you are done editing this tab, click on the "DESCRIPTION TAB" to go to the next set of information. You DO NOT have to hit create or update on every screen. Just once after you have completed creating or updating all your item information is enough.
DESCRIPTION Tab Settings:
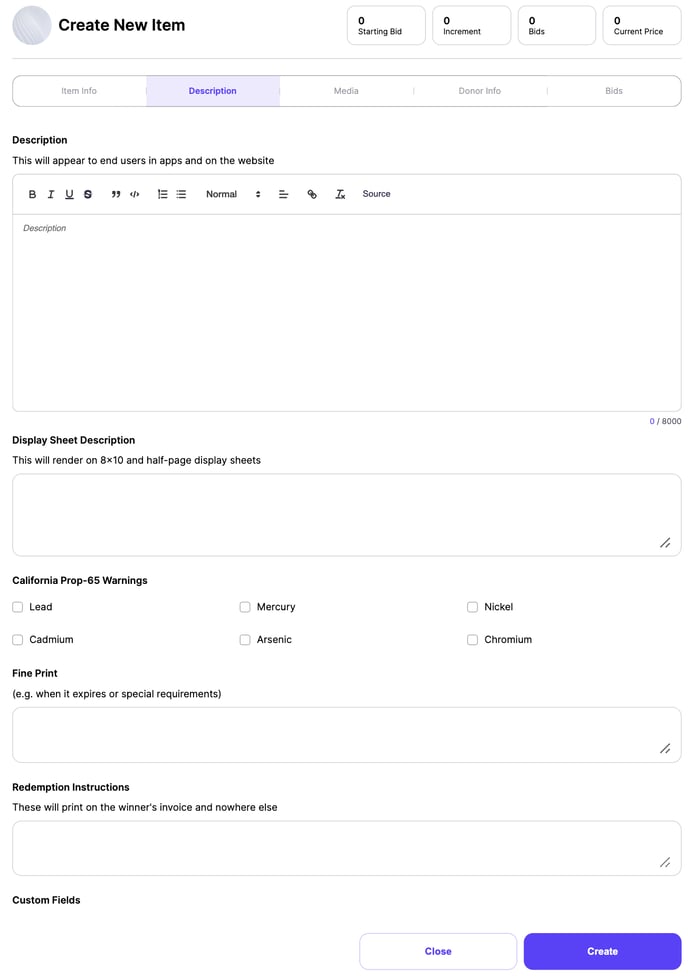
- Description - Enter your description here. We have provided enough space (8,000 characters), please use as much as you need to get all the details written, but don't feel obligated to take up the entire space. You can now format the item description. This includes basic formatting (bold, italics, underscore,) and more advanced formatting like spacing, bullets, and the ability to hyperlink.
- Display Sheet Description - This is what will display when you generate display sheets. This will allow for 400 characters and will print on the 8x10, 5x7, 1/2 page folded sheet, or coaster sized display sheets.
- Fine Print - This area allows you to provide any additional information, restrictions or criteria related to the item, such as expiration dates, must be 21 or older to purchase, blackout dates, etc.
- Redemption Instructions - Here you can put in specific information that will ONLY appear on the winner's invoice. This could be information about how to redeem the item, door codes to enter a vacation home, phone numbers on who to contact, etc. This information is private and only relevant to the winner.
- Custom Notes Label - This is an area where you have the ability to create your own custom title.
- Custom Notes - This going to be the body that will correlate with your custom title.
DONOR INFO Tab Settings:

- Donor Name - The name of the person or organization that donated the item. We provide this information so the auction manager can track it and the donor can be recognized.
- Donor Contact - Use this space to enter in the donor contact name, phone, or address. This information is NOT displayed to the bidders and is used by the auction manager only.
- Display Sheet Donor Name - What the Donor of an item would be shown as on a display sheet
- Hit the CREATE OR UPDATE button at the bottom of the page to add the item
- Retrieval instructions - These are options to track how the auction can receive the donated item.
- Donation Type - This is where you (or the donor) can enter the type of item. A physical item, a certificate, or both.
- Item Status - This is for the auction manager to track the status of the item. The status can be pending, received, waiting on donor, waiting on pickup, or canceled/lost.
- Pickup Instructions - This area can be used to add any special instructions for the item. These instructions are only seen in Handbid Manager. Your bidders will not see these instructions.