Before you launch your auction, the first thing you will need to do is to create your auction site. If you are new to Handbid, this article will walk you through the process. If you are well seasoned at this, you can consider copying a previous auction as a starting point. Copying a previous auction will save you some configuration time.
Real Auction vs. Test Auction
Handbid allows managers to create one test auction in their account. If you have not already done this, you will see an option to Create Test Auction in your menu.
What is a Test Auction?
A test auction gives you the opportunity to play around to get a feel for how Handbid works and troubleshoot your auction. It allows you to create 5 items to simulate an auction (change auction status, place bids, make donations, close the auction, etc.). It will operate exactly like a normal auction except you only get 5 items to set up on a test site. If you want to perform a dry run, consider using your test auction to troubleshoot, especially when testing a Live Stream for a virtual event.
Note: your Test Auction will have the word TEST in front of its name so bidders will understand it is not a real auction.
How do I Create a Test Auction?
To create a test auction, just click AUCTIONS on the left of your screen and then +Create Test Auction button. If you do not see this option, please contact us at service@handbid.com.

Creating a New Auction
You can create a new auction by clicking on the CREATE AUCTION button. This will pull up the Create Auction form. This form is segmented into a series of tabs. It's best to go through each of these tabs in order to set up your auction. Once you've completed this, hit the SUBMIT button.

Auction Settings Tabs
The following tabs make up the Auction Settings form:
- Info - This consists of your basic auction information (Name, URL, status, custom terms etc.)
- Team - Managing your team members and their permissions
- Goals - This is where you can set your fundraising goals for your auction.
- Event - Event-related info goes here (start and end times, location, attire, description)
- Images - Your auction images (logo, banner) as well as your Handbid TV images
- Financial - Financial settings (enable credit card purchases, require a card on file, premiums)
- Donations - Allows you to set recurring donation settings (monthly, quarterly, annually) and to change the amounts that people can choose to donate
- Bidders - Bidding restrictions are set here
- Templates - Your welcome message, receipt message, etc.
- Sponsors - This is where you can upload sponsor logos to recognize sponsors
Let's go through each of these Auction Settings and explain them
1. Info
The info tab will have your primary auction information in it. This will be your
- Auction Name: Make it 54 characters or less and cannot be changed once it is created. It will determine what your auction URL will be (e.g. if you call your auction "My Cool Test Auction" then your URL will be https://events.handbid.com/auctions/my_cool_test_auction). If you want to change that later, you can change the name, but the URL will be the same.
- Event Status: You can change later - leave it as Setup for now.
- Placement Label: Handbid will provide placement information to your guests on the dashboard in the app or the Website and for you on the Guest List. Placement is a generic term for "where is this person going to be sitting or participating at our event." If this is a sit-down Gala, this could be "Table" so that you could tell John Smith that he is at Table 12. At a golf tournament, this could be "Cart" so you could tell John Smith that he is in Cart 18. You can make this whatever you want (ie: Section, Group, Table, Cart, Team, etc.), or you can leave this section blank if you don't need to track placement.
- Item Sort Method: By default the sort method is by name, but if you want your items to sort by Item Code instead, you can change it here.
- Auction URL: Generated automatically when you create your auction.
- Auction Keyword / Short URL: We can add this later - we need an auction to connect it to first!
- Manager PIN for iPad: You should set a 5-digit code here so that you can enter the manager section of the iPad app.
- Facebook Pixel ID: If you have a Facebook Pixel and want to use that for your events website, you can enter it here. Facebook Pixel is a way to track what happens when people click on an ad post you create on Facebook.
- Enable Ticket Sales: If you plan to sell tickets, you will need this enabled.
- Hide Register on Website: This will REMOVE the "Register" option on your Event Site and force users to "Purchase a Ticket" in order to register.
- Auction Message: A little message that appears under the auction status.
- Custom terms: You can set custom terms users have to agree to before registering.
/auction%20info%20tab.png?width=688&height=708&name=auction%20info%20tab.png)
When you are done, click on TEAMS to go to the next tab.
2. TEAMS
Don't take on the entire load yourself! Use TEAMS to invite other staff members or volunteers to help along the way by giving them certain permissions or access to Handbid.
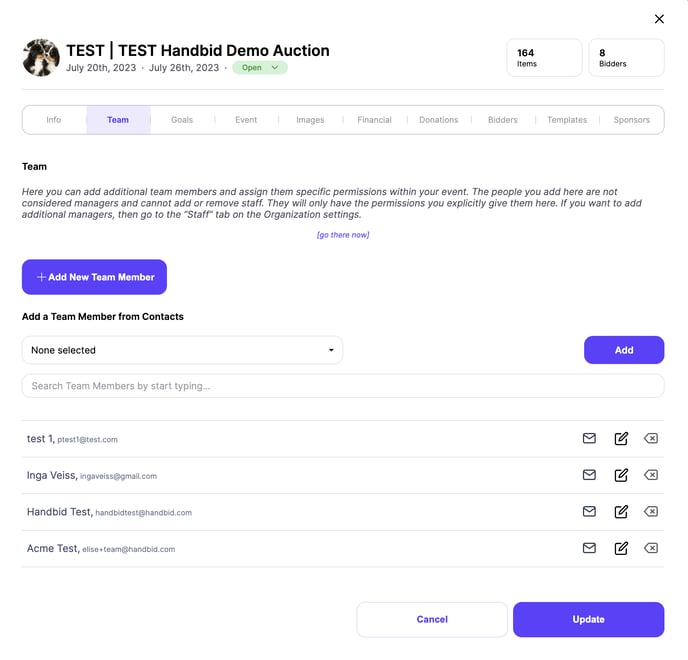 When you are done, click on GOALS to go to the next tab.
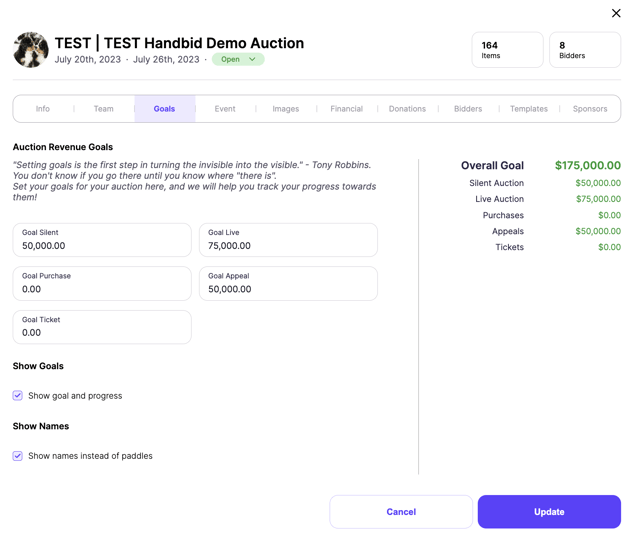
3. GOALS
We love Goals. After all, if you don't know where you are going, how do you know if you get there? Goal setting also drives all of the thermometers in Handbid, so be thoughtful about what you put here.
A few rules of thumb on goal setting:
- It is rare that your silent auction will do MORE than the total fair market value of your silent auction items. So if the total value of your items is $5,000, it would be tough to get $10,000. Not impossible, but tough.
- Just because you did $10,000 last year doesn't mean you will do the same this year. You may do $5k or you may do $20k. It will all depend on your items, number of bidders, timeframes, etc. Our suggestion? Set a goal of 80% of your FMV and try to blow that number away (that would be a good performance).
Set goals for each area that you want to track: Silent, Live, Purchases (wine pulls, raffles, etc.), Appeal (donations), and Tickets (admission). If you are not offering any items in a certain section (e.g. no Live auction), then just leave it $0.
Goal Silent- This is your silent auction goal. Please keep in mind that if you are doing a virtual/online-only auction and have live items categorized as silent, they will also fall into this goal.
Goal Live-During an in-person event where you have a live auctioneer auctioning off live items, this will be your goal amount for Live Auction items.
Goal Purchase- This is your goal for For Sale items. These are items that are not bid upon and have a set price.
Goal Appeal- This is your direct donation goal. Please note that if you are not a 501(c)(3), donations will not be enabled in your auction and you will not utilize this goal box.
Goal Ticket- If you have purchased ticketing and enabled ticket sales in your auction/ fundraiser/ event, this will be your ticket goal.
When you are done, click on EVENT to go to the next tab.
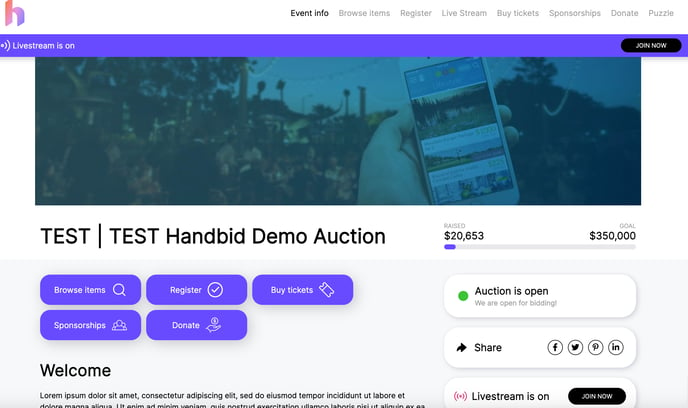
4. Event
This is where you will put in your event information. This includes start times and end times (for information purposes only), event description, and auction images. Note, this is NOT an auction start or end time. This is the start and end time for your event! Your auction could open before this and it could end after. These start and end times will NOT trigger your auction to automatically open/close at the time you elect.
See below for each of the fields you can enter.
.png?width=688&height=864&name=Event%20tab%20(auction%2cp2p%2ccampaign).png)
Event Location
Handbid tries to make this easy by using Google Places to look up the event venue (you can enter it yourself if you prefer). For example, if your event is at the Westin Denver Downtown, you can simply type that in and let Google find it. Once you select the venue, Google will populate the address, the vanity address (a location most people will understand), the timezone, and the country.
If Google is unable to find your venue, you will need to input information manually, including the time zone (which is a required field).
Virtual/Online Only Event - If you're unable to host an in-person event and have decided to go virtual, you will select this checkbox. Once you select this checkbox, the fields listed below will disappear.
QR Code - Once the auction is created, a QR code will appear under the event tab. If the user has the app downloaded, the QR code will direct the user to the event in the app. If a user does not have the app downloaded, the QR code will direct the user to the event site on the web browser on their phone (chrome, safari, etc.).
Time Zone - Select the time zone for your auction location. The list of time zones will be based on the country and state (province) you specify for your event. If your time zone does not populate, set your address (Street, City, State/Province, Postal Code, Country), save the auction settings then come back to see if the list updates with your time zone. Once the address and time zone is set, a map for your venue will be displayed on the Handbid website.
Vanity Address - Display or Venue name of where your event will take place. (Example: Westin Denver Downtown)
Description - This provides your audience with detailed information about your event. Note: the editing tool in the description field uses basic formatting (Bold, Italics, Underline).
Attire - This is where you will share the appropriate or required attire for your event. For example Cocktail, Casual, Business Casual, Black tie, etc.
Event Images - These images will appear below the description on your event home page.
Then tap on IMAGES to continue.
5. Images
Here you will set your Auction Logo, Auction Social Media Image, Auction Banner, Auction Donation Ticket, and your Handbid TV settings.
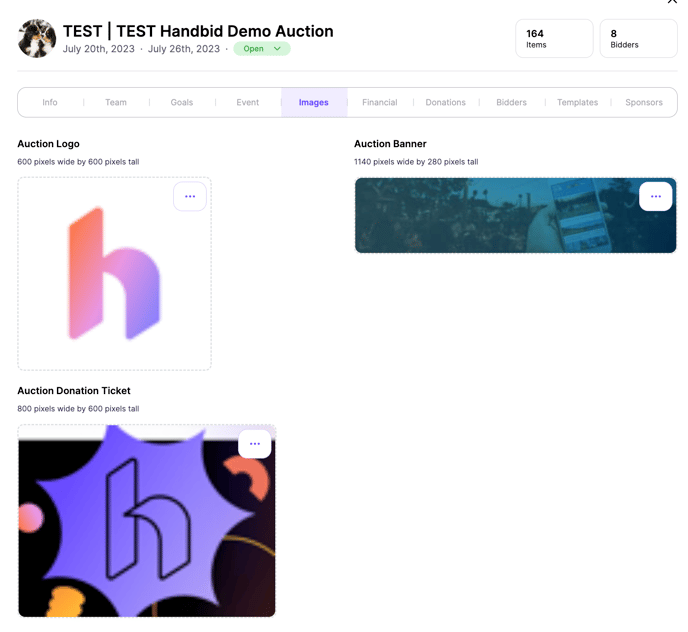
Auction Logo – This auction logo will appear in the upper left on the Event Site. This image should be a square format with the maximum recommended size of 600 pixels wide by 600 pixels tall.
Auction Social Media Image - This image will display when you share the auction across any social media platforms. This image should be 1200 pixels wil by 628 pixels tall.
Auction Banner - This image will get displayed at the top of your auction page on the events.handbid.com website. This image should be 1140 pixels wide by 280 pixels tall.
See the example image below.
You can come back and edit or add your logo and banner at a later time. We have plenty of articles on how to edit your banner and logo, so it may be best to visit these later.
Auction Donation Ticket - This image will display on your Ticketing page, Sponsorship page, and Donation page. This image should be 800 pixels wide by 600 pixels tall.
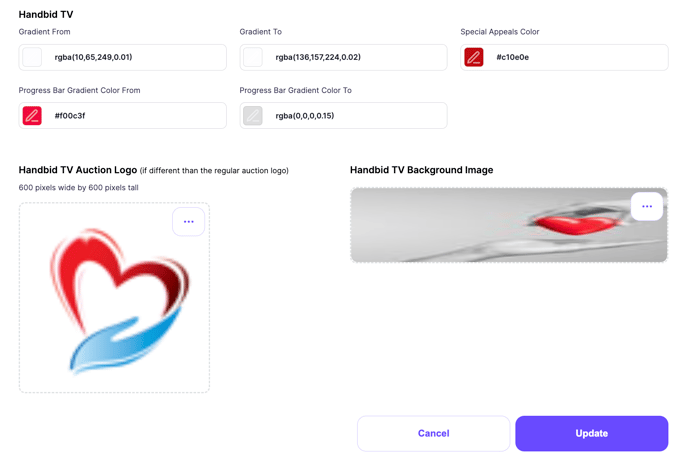
Handbid TV - Handbid TV is Handbid's live dashboard and offers several different live visuals (Live-Ticker, Direct Donation Thermometer, Silent Auction Goals, Top Grossing Auction Items, Top Items by Bid Activity, Puzzle, Top Grossing Sale Items, Handbid TV Home). If you plan to use this, you may find that your logo might not look perfect on the Handbid TV screens. This is the place where you can change it.
For more information on how you can use Handbid TV at your event click here.
Moreover, you can customize the background colors on Handbid TV using Hex values or using a Color Picker.
Done with images? Tap the FINANCIAL tab and let's move on.
6. Financial
This is the section where you will set your payment settings.
%20.png?width=688&height=541&name=Financial%20tab%20(auction%2c%20p2p%2c%20campaign)%20.png)
Enable Credit Card Processing through Handbid - We offer this service as a convenience. However, we charge a 3.5% transaction fee in addition to $.30 transaction fee on all funds processed using this system.
If you do not check this box, users will NOT be able to pay from their phones or website! By checking this box, users will be able to add credit card (CC) information to their account and will have the option to make a payment directly from their invoice (within the app). You will also be able to charge stored credit cards within the Auction Manager.
Here are some things to consider about our CC system.
- You must enable this if you want to require users to add a card on file to bid.
- Credit cards are NOT automatically charged. Even if someone has a card on file, they can choose to pay with the card they have on file, add a different credit card, or pay by cash or check.
Require Credit Card - If this box is checked, bidders will be prompted to enter a credit card before they are allowed to place a bid or purchase an item. (NOTE: Enable Credit Card must be checked to use this option).
Spending Threshold Field- If you require a card to bid, you can set a threshold here that represents when the requirement kicks in. For example, if you put 100 here, then Handbid will allow a bidder to bid up to $100 before it prompts the user for a credit card.
If this field is left blank, then the threshold is assumed to be 0. In this case, bidders will have to enter a credit card before they are allowed to place ANY bid. (PLEASE NOTE: Enable Credit Card Support and Require Credit Card must both be checked to use this option).
Require User Enter Address to Pay - If this box is checked, bidders will be prompted to enter their home address before they are allowed to pay.
Auction Premium - This is a percentage that will be added to each applicable item's final selling price on the users invoice. Once a premium has been added to an invoice, you will NOT be able to remove it.
Currency - The default setting is US Dollar (USD) if you're outside of the US, you can change it to the appropriate currency. If you change this setting, your CC transactions will also change to the currency you have selected.
Processing Transaction in a Foreign Currency
Note, if you do not have your own processor account connected (e.g. your own Stripe account), then your transactions will be settled into Handbid's account in USD. If your auction is in a foreign currency, you will then incur foreign transaction fees! To avoid these fees, we highly recommend our customers running auctions in foreign currencies to set up their own merchant accounts.
Also note, you can not change the currency in an open auction. You will need to change the auction setting back into setup status to change it.
Prompt Purchaser to Cover CC Fees - Checking this box will display a pop-up box when a bidder goes to pay their invoice. The window will ask them to pay the credit card fees on their invoice. They can choose rather to check the box to cover the fees or to not check the box and NOT cover the fees. If they do not cover the fees, the organization will cover the credit card fees.
Enable this by default? - Enabling by default will automatically check the 'Pay Credit Card Fees' checkbox in the pop-up window when a bidder goes to pay. In other words, the bidder will have to unchceck the 'Pay Credit Card Fees' checkbox in order to avoid absorbing the cost of the fees. If they don't uncheck it, it will default to them paying their balance plus the credit card fees.
Once you have your Financial settings done, click on the DONATIONS tab to continue
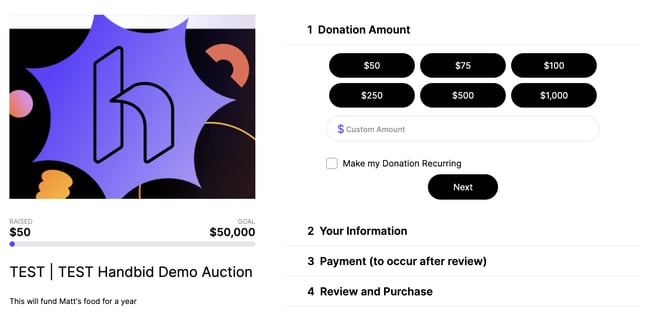
8. Donations
Using your EIN number, Handbid will be able to identify if your organization is a registered charity. If your organization is not a registered charity, Handbid will not allow the collection of donations.
.png?width=688&height=778&name=donations%20tab%20(auction%2c%20p2p%2c%20campaign).png)
Enable Donation Page - This turns on another page on the event site and allows you to set up to 6 levels of your choice, as well as offer a blank "custom" field.
Allow Pledged Donations - This will allow your bidders to add a donation to their invoices without having a credit card on file. When you conduct an ask and direct bidders to make donations through the app, they can add donations quickly without adding a credit card until they pay their invoice.
Set a Minimum Donation Amount - If you do not wish to allow donations below a certain amount, enter the specific amount in the minimum donation amount field provided.
Allow Recurring Donations - If you decide you want to allow recurring donations on a schedule, select this checkbox. When you select the checkbox, you will be provided with additional settings for this function
- Monthly, Quarterly, Annually Checkbox - You can select one or all of these checkboxes to allow your donors to schedule their contributions.
- Default Frequency - This is the frequency type that will be auto-selected when a donor elects to opt-in for recurring donations.
- Max Allowed Donation - You will have the option to select how long your donor's contributions will continue to occur (12 months, 24 months, 36 months, or No expiration). Please keep in mind the duration of your contract with Handbid when selecting this option. Once your contract with Handbid has expired, all future contributions past that date will not process.
- Donation Description - This will appear on the donation page of the event site. See below:
Click the BIDDERS tab to proceed
8. Bidders
Here you can set restrictions on who and how people can bid (really not our favorite idea). But if you need to restrict bidding to only those you authorize or if you want to limit what people can spend, this is the place to do it!
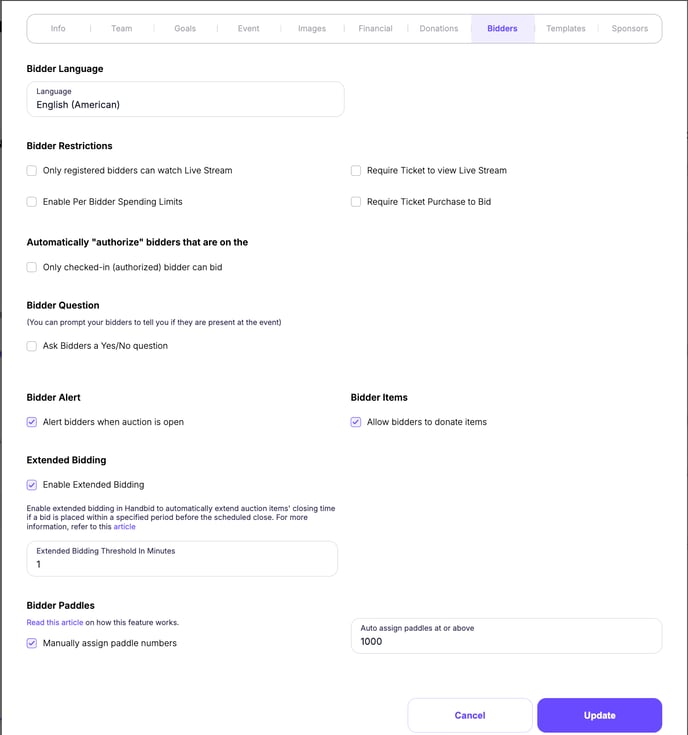
Bidder Language
Bidding Restrictions:
- Only registered bidders can watch Live Stream - Limit viewing of the Livestream to those that are registered bidders in your auction/event.
- Require Ticket to view Livestream - Limit viewers of the Livestream to those bidders that also purchased tickets. Remember, guests that purchase tickets are automatically registered as bidders.
-
Enable Per Bidder Spending Limits - If you turn this on, then you can set a spending limit on a particular bidder. When would you want to do this? Rarely - but there are a few examples:
- School auctions where the parents want the kids to be able to bid up to a specific amount.
- Bidders with credit issues or past payment issues. If you have a bidder you want to BAN from your auctions, the best way to do that is to check this box and give the bidder a spending limit of $1. You will add the spending threshold in the individual bidder profile.
- Require Ticket Purchase to Bid - Allow ticket purchasers ONLY to bid in your auction.
Automatically "authorize" bidders that are on the:
Only Checked in (authorized) bidder can bid - This feature gives you more control over who can bid in your auction. Want to limit bidding to local bidders only? Want to only allow specific bidders to participate? You can control this by requiring that they be checked in to bid. You can also automatically check in bidders on the Invite List or the Guest List.
-
- Invite List- This will automatically "authorize" bidders to bid who are already on the invite list.
- Guest List- This will automatically "authorize" bidders to bid who are on the guest list.
Ask bidders a Yes/No question - Do you want to know how many of your bidders are physically at your event? Ask them! "Are you bidding from the arena tonight?" They will be prompted with this question so you can tally your OnSite-vs-remote bidders. Remember when you check the box for this, you need to populate the question box to the left. You can also ask them any Yes/ No question or two answer question. For example: Are you picking up your items in San Angelo or Midland?
Bidder Alert
Alert bidders when auction is open - When you open your auction, this checkbox allows Handbid to automatically alert your guests to notify them to start bidding!
Allow bidders to donate items - To save yourself some time, allow your donors to come directly to your site to donate items and fill out item information.
Bidder Paddles
Manually assign paddle numbers - Instead of going in and adding paddles individually, let Handbid do the cumbersome work for you! Select this checkbox to auto-assign the paddle number and set the starting paddle number. You can also choose to manually assign paddle numbers. Click here for more information on how to manually assign paddle numbers.
Auto assign paddles at or above - If you are manually assigning paddles, you will want to choose a number OVER the number of guests that you are expecting. If you are auto-assigning paddles, you will want to choose the number that your paddles will start at.
Ok, on to the TEMPLATES tab
9. Templates
This is where you can draft your auction/event messages for Auction Receipt Message, Welcome Message, Shipping and Redemption Instructions, and Donation Description, Keyword Response (for Text-2-Give), and more.
%20.png?width=688&height=694&name=Templates%20tab%20(auction%2c%20p2p%2c%20campagin)%20.png) Default Thank You - This message is emailed to your guest after they make any direct donation through the donate tab. Below is an example Default Thank You note :
Default Thank You - This message is emailed to your guest after they make any direct donation through the donate tab. Below is an example Default Thank You note :
Hi [Insert Token], thank you for your continued support to [Insert Token].
We appreciate your generosity. If you have any questions regarding this donation please contact Bob Smith at 555-555-5555 or bsmith@emailaddress.com
Receipt / Invoice Message - This is the message that will print on the bottom of every receipt. We HIGHLY recommend you include contact information for picking up auction items, a thank you for supporting your organization, and tax information, if applicable. You can use the list of "tokens" on the right to personalize your message (tokens will trigger the site to auto-populate certain pieces of information. ex: First Name, Last Name, etc.). Below an example receipt note:
Thank you {bidder} for your participation in the {auction} Auction! Our {org} could not function without your generous support. This receipt/invoice will serve as an official statement for items purchased at this event. We are a 501c3, so some portion of your total may be tax deductible. Please consult with a tax advisor to determine the amount (if any) you may be able to deduct. If you have additional questions about the auction or your items, please contact Bob Smith at 555-555-5555 or bmith.
Welcome Message - Your welcome message will show up when your bidders register in your auction. Below is an example text.
{bidder} -
Welcome to the {org} {auction}! We appreciate your support and participation.
We have Auction Volunteers who can help you place or track bids throughout the evening.
We hope you find something you like in our Auction. Funds raised will support our programs and activities throughout the year. Feel free to contact us if you have questions!
The Cause Team, email@nonprofit.org
Shipping / Redemption instructions - This is a custom message that will be sent to the auction winners. We recommend including the auction manager's contact information in case shipping needs to be arranged as well as noting that shipping fees will be assessed on auction items that need to be shipped. Also, let your bidders know where and when check-out is.
Live Auction Message - This message populates on every one of your live auction items.
/Live%20Auction%20Item%20Message%20Image.png?width=688&height=308&name=Live%20Auction%20Item%20Message%20Image.png)
Item Donation Thank You Note - This message will be emailed to any donor who donates an item to your auction.
[Insert Token] - Bidder name
Thank you for your item donation to the [Insert Token]! Your generosity helps us to put together an incredible auction for our guests. If you have any questions you can contact [Insert Token] at [Insert Token].
Please keep this email for your records.
Gracious thanks,
[Insert Token] - Organization Name
[Insert Token] - Organization EIN
Keyword Response Message - This template is the response message that is sent when someone texts the keyword using Text-2-Give feature. You can learn more about Text-2-Give in this article.
Ok, almost done, just ONE more tab - SPONSORS!
10. Sponsors
This is the tab where you can recognize your sponsors. Handbid has 5 types of sponsor sections: Mobile Splash (which is where you can highlight a key sponsor for your event), an Event Banner Sponsor, a Title Sponsor, Live Stream Sponsor and Web Sponsors
If you have this information ready, you can add it now.
Adding a Mobile Sponsor: How to add a mobile sponsor
Adding Web Sponsors: Instructions on how to add web sponsors here
.png?width=567&height=498&name=Sponsor%20tab%20(auction%2c%20p2p%2c%20campaign).png)
Title sponsors
You can now highlight a Title sponsor for your event! Fill out your Title sponsor info. We will use the Makkai Group as our example.
This is how it will appear on the user site.