- Article Index:
To skip ahead, click a section title below.
- Peer-to-Peer Fundraising Setup Instructions/settings
- Info Tab
- Team Tab
- Goals Tab
- Event Info Tab
- Images/ Tab
- Financial Tab
- Donations Tab
- Fundraisers Tab
- Sponsors Tab
Peer-to-Peer Fundraising Setup Instructions
We will cover each of the Settings Gear Wheel tabs in a Peer-to-Peer fundraiser setup below.
1. Info Tab
This tab is where you will enter the name of your Peer-to-Peer and overall options. The key fields on this tab are the Name, Peer to Peer URL, and status.
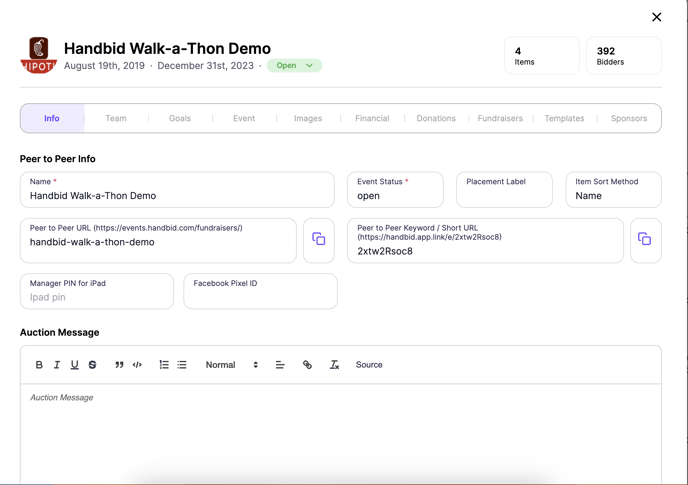
- Fundraiser Name
Give your name some careful consideration as your URL will be built from your name. If you, later on, change the name, your URL WILL NOT CHANGE to match it. This is to preserve any broken links on the site from external systems that have saved your URL (including search engines). - Fundraiser URL
When you are creating a new fundraiser, you will not have the option of changing this. Instead, you will see it populated with some strange characters. Just ignore those as your URL will be created off of your Name. For example, if you name your event, "Miracle Move a Thon", then your URL will be created as https://events.handbid.com/fundraisers/miracle-move-a-thon - Fundraiser Status
For a new fundraiser, this will default to setup. Do not change the status on this page. Instead, change the status on the main fundraiser page.
Statuses include the following:- SETUP - This is a construction status. In setup mode, no external person or system can see the fundraiser. Instead, it will only be visible in the manager.
- PAUSE - This will pause your auction or fundraiser and will not allow donors to participate until you unpause.
- PREVIEW - When you are ready to have people preview your site but not yet make donations, then you can put it in this status.
- PRESALE - This state will allow you to sell tickets or any other items marked available for pre-sale. Fundraising pages will not be visible
- OPEN - When a fundraiser is open, it will be visible and all pages (that are open) can accept donations.
- CLOSED - When you are ready to end your fundraiser, you can move it to a closed status. This will close all open fundraising pages and disable future donations to pages.
- Placement Label
If your event will have guests and you want to organize them into seating or placement, then you can add a label here for your placement method. For example, if you are hosting a Gala and you will organize your guests into Tables, then put "Table" in for the placement label. However, if you are hosting a golf tournament and your guests will be organized into carts or "groups", then put in "Cart" or "Group" here. The label is used to notify guests (and you) where someone will be (e.g. Table 12 or Cart 18A). - Item Sort Method
If you intend to have items in your fundraiser, your guests will see them sorted in Alpha order. If you prefer to sort them by their item codes, then change this option to "Code"
2. Team Tab
You can select a pre-defined role AND add/remove additional/some of the permissions, if you wish. The Teams feature allows you to assign roles to your team members. Each predefined Team role has different levels of governance and permissions so that you can determine who needs access to specific processes and information for your event.
/Teams%20Tab.png?width=688&height=660&name=Teams%20Tab.png)

3. Goals Tab
This tab is where you will enter your Fundraiser's goals. Goals are important because they drive the thermometers in the manager. In addition, they provide some perspective on your fundraiser's performance. To help you establish a fundraising goal, we have structured the Page goal as a two-step process. Managers have access to set custom goals or use page goals.
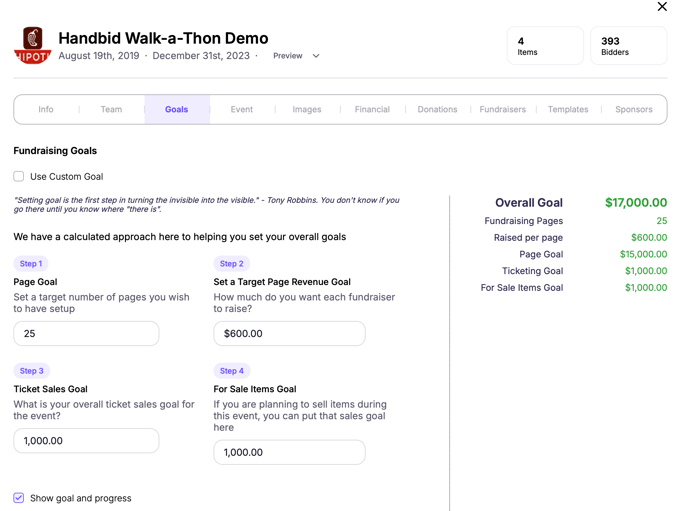
- Step 1 - Page Goal
In simple terms, how many pages do you want to have? Another way to phrase the question is, "how many fundraisers do you want to recruit?" Perhaps you have a population of 1000 people in your donor management system and want to recruit 10% of them to create a page and raise money for you. Then you would set a page goal of 100.
Peer-to-peer works when you have people connecting to your fundraiser and creating pages. The power of your social network reach is amplified with each new fundraiser added. So recruiting fundraisers is a critical success factor! - Step 2 - Page Revenue Goal
For each fundraiser, your next step is to set a target page goal. This will be the default goal that each fundraiser will have when they create their page (although they can change it). It is hard for us to recommend a number here. Only you know your fundraisers and your organization, so only you know what is possible. We do recommend you be reasonable here. If you were planning to recruit 100 fundraisers and felt that each should be able to raise $500 each, then set $500 as your per-page goal and monitor it.
The product of your page goal and per-page-revenue goal will be your overall fundraiser revenue goal. In this example, our 100 pages each with $500 raised would give us a $50,000 goal. If you go through this exercise and the result is more than you expected, then you can either leave it or adjust either step. Likewise, if the product was LESS than you expected, then you need to decide which factor you want to adjust (number of fundraisers or per-page goal). Our only recommendation here is to make sure you put in something achievable. - Ticket and For Sale Item Goals
You can also put in goals for your ticket sales or "forSale" items you add to your fundraiser (e.g. merchandise). - Show Goal and Progress
This checkbox will allow you to share (or hide) your event's progress on the Events Site. If you uncheck this box, then your event's thermometers will be hidden.
4. Event Info Tab
This tab is where you will enter your Event information. If your event is purely online, you don't need to set a location, but you will need to set a timezone. You will also want to set Start and End times for your event.
.png?width=514&height=646&name=Event%20tab%20(auction%2cp2p%2ccampaign).png)
- Event Location
If you are hosting an event at a physical location, then you can use this field to enter in that location. Handbid uses Google Places to look up the location, so its best to try something like "Budweiser Events Center" rather than 5290 Arena Circle, Loveland CO. If Google finds the "Place", Handbid will populate the "location" with the place's address and then put the name of the place in the vanity address field. - Event Time Zone
In addition, Handbid will use the event's location to populate the timezone. If you do not specify a location, then you will need to separately specify a timezone for your event.
Timezones are based on Country, so if your Organization country or Event country is not specified, this will default to the United States. You can always CREATE your event, and then correct the country setting and update the timezone after your event is created if you noticed this was not correct. - Event Start and End Times
All events start at a certain time and end at a planned time. Your fundraisers and donors will want to know when those are. Specify them here. These should be entered in military time. For example, 10:00 PM is 22:00:00. - Event Description
You have 8000 characters to write up a detailed description of your event. You also have some basic formatting abilities here. Note that special formatting will consume more of your character limit as some hidden formatting characters are added to the text (e.g. bolded text will store like <b>Bolded Text</b> (adding in 6 additional characters you won't see) - Fundraiser Images
You can add up to 3 additional images that will appear on your homepage. To add these images, click on "Add Image" and select the image you wish to add.
5. Images Tab
This tab is where you will add a logo and banner for your event fundraising page.

/Images%20Tab.png?width=688&height=490&name=Images%20Tab.png)
- Peer to Peer Logo
Similar to the Handbid auction logo, this is a square logo that will appear on your fundraising page in the upper lefthand corner. - Peer to Peer Banner
The event banner is a wide banner on the top of your event page. This banner is a great way to provide some custom branding to your event page.
We have an article for Auctions on how to make your logo and banner look the best they possibly can, and those instructions apply here as well. We strongly recommend you read through that article (click the highlighted text in the previous sentence) before you create your logo and banner. - Peer to Peer Social Media Image
The social media image will show on any social media platform where you choose to share your fundraiser. - Peer to Peer Donation Ticket
The peer to peer donation ticket image will show up on your ticketing page (if you have this associated with your fundraiser), and your donation page. - Default Page Photo
The default page photo will show up on any fundraiser's page unless they choose to replace it with their own photo.
6. Event Financial Tab
This tab holds the financial settings for your fundraiser including credit card processing, donation levels, premiums, and fees.
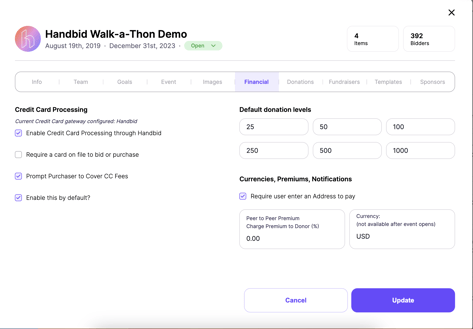
- Credit Card Processing & Require a Card
By default, you will want to check "Enable Credit Card Processing through Handbid", even if you intend to set up your own merchant account. If this option is not checked, then you will not be able to collect donations online through the fundraising system!
For "Require a Card on file", this will not apply to donations and ticket sales, because in those situations, Handbid will process the transaction at the time the user makes it. Instead, this option will only apply to forSale purchases made on Handbid that would generate an invoice for the user. - Default Donation Levels
Here you can enter in the default options shown to users when making a donation. Users will always have the option of entering in a custom amount as well.
- Currency
Select your currency for donations and purchases. This will be originally set to the default currency for your organization, but you can change it here. Once a fundraiser has started, this can't be changed, so please make sure it is correct before you open your fundraiser. - Prompt Purchaser to Cover Fees & Enable by Default
This setting allows you to prompt a purchaser (in most cases a "donor") to cover the credit card fees associated with the transaction. Handbid will present the option as a checkbox where the donor can opt-in or opt-out.
"Enable by Default" turns this option into an "opt-out" scenario, meaning the option will be "enabled" for the user and they will have to "un-check" it to opt-out of covering the fees.
7. Donations Tab
- Enable Donation Page
This box MUST be checked in order to collect donations through your fundraiser - Allow Pledged Donations
Pledge donations allow bidders to make a donation without charging their credit card on file. If you do not have this setting enabled, your bidders will be required to add and charge a credit card in order to make a donation. - Set a minimum donation amount
This setting allows you to set the minimum amount a user can donate. We recommend you consider a minimum that will keep your transaction fees below 10% of the purchase price. Transaction fees are a higher percentage of a donation at lower levels because the per-transaction fee amount factors in a higher percentage.
For example, if your transaction fees were 3.5% + .30 per transaction, then a $5 donation in US currency would be 48 cents or 9.6% of the transaction amount. However, if your minimum donation amount was $2, your fees would be 37 cents (19% of the transaction amount). - Allow Recurring Donations
A Recurring Donation will charge a credit card at the frequency chosen (monthly, quarterly, annually) . A donor will choose the amount, frequency and how many cycles to repeat the donation from the Event Page. Auction Managers can add and manage recurring donations in Manager. IN ORDER TO ACCEPT RECURRING DONATIONS, YOUR STRIPE ACCOUNT MUST BE CONNECTED.
- Donation Description
This will show up on your donation page. This is a great place to indicate information about what causes are being supported through your fundraiser. Managers can now disable general donations themselves. 
8. Fundraisers Tab
This tab holds the fundraiser permission settings for your event.
.png?width=688&height=613&name=Fundraisers%20tab%20(p2p%20only).png)
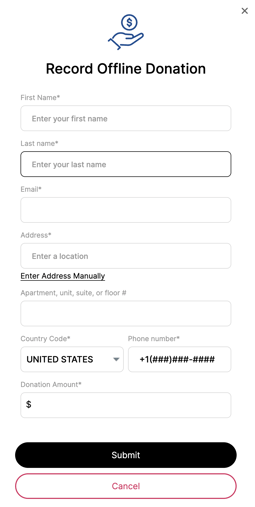
- Allowing fundraisers to enter offline donations
An offline donation is a non-credit-card donation that your fundraiser may collect (e.g. cash or check). In those cases, you can allow fundraisers to enter in offline donations which will create a donation in the system that will be connected to their page.When your fundraiser selects this option, a form will appear where they can enter in their offline donation information. Once they submit this, Handbid will create a donation and attribute it to their page. The donation will be marked as "unpaid" and an invoice with a balance due will appear on the backend.
You should instruct your fundraisers on where/how to send in the offline payments they collected (cash or checks).
Once you receive the funds, a manager will need to log in to the backend and pay the invoice.
- Allowing donations to immediately update the thermometer
If this option remains disabled, the transaction will not appear on the fundraisers page (and their thermometer will not increase accordingly) until the invoice is paid. If you would prefer to give the fundraiser credit for the donation, even though the monies have not been collected, then you can enable this option. - Auto-approve new fundraising pages and teams
By default, new pages created by fundraisers are put into a "pending" state and are not open to accepting donations. This gives managers the opportunity to review a page and approve it before it goes live. If you would prefer not to do that and want all newly created pages to be immediately available for donations, then you need to enable this option. - Allow fundraisers to create teams
This allows your fundraisers to form their own teams instead of you, the event manager, adding them in the backend. - Notify event hosts of big donations & big donations threshold
What is a big donation? Well, you will need to tell Handbid that by entering an amount in the "Big Donations Threshold" box. Anytime a donation comes into Handbid that meets or exceeds that threshold, Handbid will tell you about it (send you a notification). - Notifications / Send Weekly Notification
This option will send out a weekly notification to all page owners at the time you specify. This is a good way to send out an update on progress and/or remind fundraisers about upcoming events. You can modify the weekly notification message in the TEMPLATES tab. - Privacy
This setting will hide the leaderboard option, the become a fundraiser option, and the fundraiser list. All pages will need to be created or imported from Handbid Manager.
9. Templates Tab
When setting up your event, you will probably spend the most amount of time in this tab, as you need to add in a template for a variety of notifications. (Although, we recommend creating your fundraiser first and then coming back in to fully complete your templates)
In this section, we will explain how to create a template and use the tokens on the right as placeholders for event information.
%20.png?width=671&height=561&name=Templates%20tab%20(auction%2c%20p2p%2c%20campagin)%20.png)
To edit a template, select it from the Template Name select box on the left side. When you see a label next to the name that says "(!empty)", that just means that this template is currently BLANK.
Please follow this link if you would like more information and details on the peer-to-peer templates.
As you change out templates, you will notice that the available tokens on the right will change. Handbid tries to provide only relevant tokens for the template you are currently editing.
Inserting in Placeholder Tokens
Placeholder tokens are organized into three groups:
- Donation Tokens: information about a specific donation. This includes the donor's information, the fundraising page info, and details on the donation.
- Event Tokens: information about the event (name, date, primary contact)
- Organization Tokens: information about the organization that is running the fundraiser (Name and Tax ID)
To insert a token, find a location in your text (in the left text box) where you want to insert it, and then click on the token name on the right. It will insert it in this format
For example, if you wanted to create a Default Thank You that said addressed the donor and thanked them for their donation, your template may look something like this:
Dear [[donationFirstName]],
Thank you so much for your generous donation of to [[donationFundraiserName]]'s page. Your donation has now put [[donationFundraiserName]] at [[donationGoal]]% of their goal!
Your donation will go a long way to helping [[organizationName]] achieve its goals. We really appreciate it.
Also, do not forget,[[organizationName]] is a registered charity with TaxID: [[organizationTaxId]]. You will receive a separate email with your receipt that you can share with your accountant.
Once you are done editing your templates you can move on. When creating your fundraiser for the first time, we recommend coming back into this dialog to edit these after your fundraiser has been created.
10. Sponsors Tab
You can add sponsor logos to your event home page by adding them here on this tab.
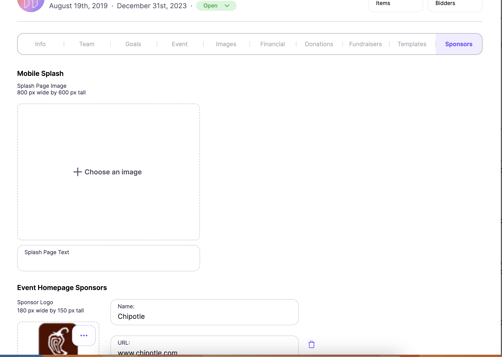
To add a sponsor, click the "Plus" icon and complete the following information
- Sponsor Name - the name that you want to appear as the Sponsor.
- Sponsor URL - this will be the web address that Handbid will direct users to when they click on your sponsor's logo. In most cases, your sponsor will give you this URL. Be sure to enter it in here accurately as the sponsor may have included some ad-tracking code in it.
- Sort Order - by default, this will be 1. You can change this number to affect the sorting on the Events page.
- Sponsor Logo - Enter in an image that has a 180 x 150 pixel aspect ratio, which is a standard "Small Rectangle" ad size.
When you are done with these tabs, click "CREATE" to create your fundraiser. You can then go into the fundraiser's dashboard to continue editing settings or start creating pages!