The Handbid Ticketing System allows you to sell event tickets (admission) for your auction/event. Once a ticket is created the "Buy Tickets" button and tab will appear on the event site. (The default label is "Buy Tickets" and can be customized with Theme Editor)
CREATE AN INDIVIDUAL TICKET
Video:
Instructions:
- Select "Items" then "create new item" in the toolbar .
- Select "Ticket" and click the green CREATE SELECTED ITEM button.
- Complete the ITEM INFO tab.
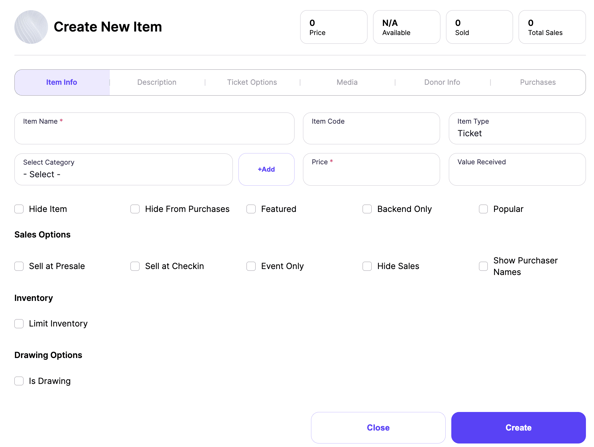
-
- Item Name - Keep this as short as possible. 54 characters or less is recommended. Example: "Individual Ticket".
- Item Code - This is how you will identify the item {ticket} in your reporting.
- Item Type - This will not change.
- Select Category - Selecting a category is not required for tickets however, if you would like to track category performance, you can separate your tickets into different categories. This works well when selling tickets versus sponsorships.
- Price - Ticket price.
- Status - This will always be pending when you create an item. When your auction opens, this will be changed to open. For tickets to appear in PRESALE or PREVIEW mode: after the ticket is created go back in to the ticket and change to "open".
- Value Received - This is the value received in exchange for the ticket. This is an example of the value of what your guests are receiving. For example, if you sell a ticket that includes dinner and the value of dinner is $50, then you would put $50 here.
- Hide Item - item will not appear to the end user.
- Hide from Purchases - item will not appear on purchasers invoice.
- Featured - will appear as a featured item on the event site. Popular - will appear as a popular item on Handbid's main event search site: events.handbid.com
- Backend Only - The purpose of backend only is to create a ticket that can be added to an invoice that will not appear to the end user.
- Sales Options
- Sell at Presale - This will be available for purchase when the auction is in pre-sale mode. RECOMMENDED for ticket sales prior to an event.
- Sell at Check-in - This will be available for agents to add to a customer at registration.
- Event Only - You would use this feature if you want to sell event tickets at the event from a volunteer. The user cannot add their own ticket to their invoice.
- Hide Sales - If you do not want to show the total sold or quantity remaining of a ticket, select this.
- Show Purchasers Names - Use this option if you want to show the purchasers name rather than paddle number on the event site.
- Inventory - You can limit the inventory of the ticket by entering and inventory amount. The system will not allow more tickets to be sold than are available.
- Complete DESCRIPTION tab.
- Description and Fine Print will appear to the End User.
- Display Sheet Description - not typically used for Tickets.
- Redemption Instructions - These instructions will print on the purchaser's invoice that is emailed.
- Complete TICKET OPTIONS tab.
 Sale Start and End - Please put in when the tickets will go on sale and when sales will end. Note that the auction will still need to be in either Presale/Preview (with the presale option selected) or open for these tickets to be purchased.
- Limit per Transaction - How many of these tickets can someone buy at once? The default is unlimited.
- Admits People per Ticket - How many people does this ticket admit? For an individual ticket it would be "1". This is important because the number admitted is what will populate the guest list. If you do not put a number in here, the name will not appear on the guest list.
- Select Guest Status - This is a required field. You can select from the default of General or VIP or create a custom status by clicking "add".
- Ticket Instructions - Enter what you would like the guest to know about the ticket.
- Payment Terms - Do you want the purchaser to be able to pay later for the ticket? If so, select "Allow Purchasers to Pay Later". PLEASE NOTE: This will move this ticket under the "Sponsorships" button and tab on the event site. We suggest to only use this option for Sponsorships.
- Discount Codes - Create as many discount codes as you need for people to use to adjust the ticket price. There are two types of discounts: Amount (a whole number that will be subtracted from the ticket price. {e.g. Amt Discount with a value of 20 would deduct $20 from the price of a ticket}) and % discount (e.g. 50% off to give someone half price). The code should be a text code that you give to the purchaser to use (like a coupon code).
- Surcharge - Do you want to charge a handling fee or another surcharge? You can either apply an amount Surcharge (e.g. $2 per ticket) or a % surcharge (10% on top of the ticket price). Please note that the surcharge is different than credit card fees. Don't put 3.5% to try to cover your fees.
- Custom Questions - Custom questions allows you to ask up to 3 questions and attach them to a ticket. Each question can be answered in one of two ways: multiple choice or open-ended. Answers can be seen in the guest list view, filtered, and exported. Click here for more information on custom questions.
Next, upload your Media (Photos/Video)and you're all set!
Remember that your auction will need to be in PRESALE, PREVIEW or OPEN status to sell tickets. We recommend PRESALE - your guests can purchase tickets and donate but cannot see your items. Be sure you mark "sell at presale" to view tickets in presale mode.
Want to help your supporters purchase tickets? Consider sending this video which is found in this article: