To access the AUCTION DASHBOARD for a specific auction:
1. Go to your Handbid Auction Manager account. (manager.hand.bid)
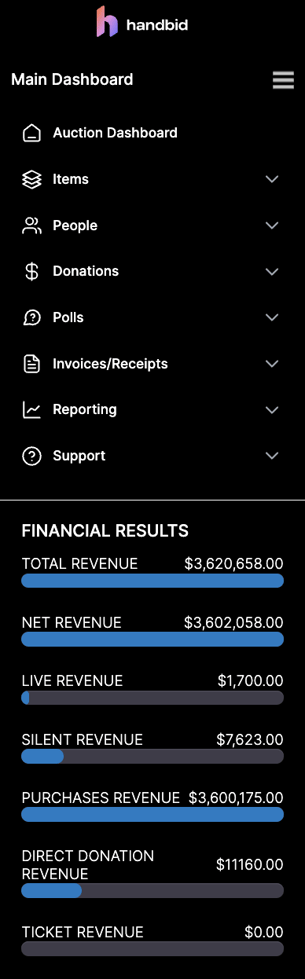
2. From your Handbid Main Dashboard, click on your auction. You can select the auction icon like the one that you see above or you can select it from the "AUCTIONS" drop-down menu on the left-hand side.
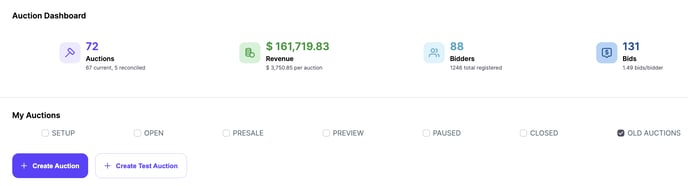
Once you have selected a specific auction from the MAIN DASHBOARD, you will be on the Auction Dashboard. From the Auction Dashboard, you will manage everything for your auction.
The Auction Dashboard allows you to see your current auction statistics, and manage your entire auction.
TOOL BOX
 The top navigation allows you to access many features within the Auction Manager.
- AUCTION SETTINGS - Select the gear wheel next to your auction name to edit information about your auction. This includes name, description, goals, event information, auction images, credit card processing, templates, and sponsors.
- ITEMS - From here, you can add new items to your auction, manage item categories, or view a complete list of your items.
- Manage Categories - This allows you to create or edit item categories, organize categories in the order you want them displayed in the apps and online and set category timer(s).
- Create New Item - This allows you to add a new auction item. This includes Silent Auction Items, Live Auction Items, For Sales Items, Ticket Items, Direct Donation Items, and Puzzle items.
- Item List - Your item list will give you a complete view of all your items and edit existing items as needed.
- BIDDERS - This function allows you to add bidders to your auction and view your bidder list.
- MESSAGES - Use the 'Messages' drop down to send broadcast messages to your bidders and open your live chat manager
- Broadcast Messages allows you to send notifications to your bidders. This will be sent via push notifications if the bidder has accepted push notifications; otherwise, it will be sent as a text message.
- Live Chat Manager allows your bidders to chat with one another in a "live forum" and also allows them to chat directly with Auction Managers privately. To learn more about the Live Chat Manager, please visit this page. Live Chat Manager can be added on for an additional cost. To learn more, please email service@handbid.com.
- BID / BUY - This dropdown will allow you to place a bid on a bidder' behalf, make a purchase (for sale item) or purchase a puzzle piece.
- Placing a bid from the desktop is most often used when conducting a live auction. As an Auction Manager, you will need to enter the live auction winners and the final sale price as these bids are (usually) not placed through the app by the bidder.
- Purchases can be added to invoices for bidders, typically when they are marked "event only" and cannot be purchased from their devices.
- Purchase a puzzle piece on behalf of bidders. What's a puzzle? Glad you asked! Learn more here!
- TICKETS - This is a shortcut to create a new ticket, purchase a ticket on a bidder's behalf or view the ticket purchase report.
- This isn't the place to dive in deep for tickets. To ensure you don't miss a beat, let's learn about the ticketing system here.
- Once you have your tickets created, you will be able to add a ticket to a bidder's invoice by selecting 'purchase a ticket'.
- Ticket Purchase Report is exactly that. A report that provides all your ticket purchases. Filter (paid / unpaid / timeframe) and export to .csv
- DONATE - This option allows you to add a new donation, enter mass appeals or view a list of all your donations.
- Add a new donation to enter a single donation for one bidder.
- When conducting a 'Paddle Raise' you will bulk enter mass appeals. New to paddle raise? No sweat! Click here to learn how to raise even more funds!
- View your list of donations to edit or remove them as needed.
- THEME - Theme allows you to customize almost every aspect of your event's color, graphics, fonts, and menus. Visit this page to learn more about Digital Seen and obtain a copy of our Digital Seen Handbook.
- LIVESTREAM - Here you will manage your live stream settings, turn on & off your livestream, as well as promote items & polls. Ready to take your auction virtual? Learn all about our livestream functionality here!
- EVENT STATUS - View and change your auction status here. This is where you will open & close your action, and everything in between! To learn more about auction status, click here.
LEFT NAVIGATION
The left navigation of the auction manager allows you to view your Auction Dashboard, manage items & people in the auction as well as manage invoices & receipts and pull reports. On the bottom, you will also find financial results in real time.
- ITEMS - Allows you to view a list of all of the items that you currently have in your auction. The menu items under the ALL are filters that will display a subset of your items that meet the criteria selected. For example, selecting Live Auction will show you all of your auction items that are marked as Live Auction Items. Click on an item name in the middle of the screen to edit information, view bid history, and more.
- PEOPLE - Allows you to view guests and bidders. A guest is someone who plans on attending your event, while a bidder is someone that has registered to participate in your auction (bid / donate). You can also access the invite system here. It is important to understand the differences between Invitees, Guests and Bidders. Click here to learn more.
- DONATIONS - This allows you to see a list of your donations, including recurring donations.
- INVOICES/RECEIPTS - This allows you to view & manage all of the invoices/receipts for your auction. You can filter your invoices on the left navigation by ALL, NOT PAID, and PAID. Bidders will be able to pay their own invoice, or, you can do it for them.
- Reporting - The reporting tab allows you to pull various reports regarding your event. You can pull reports on Ticket / Registration, Bidders, Items, Revenue / Receipts, and CRM Exports.
- Support - This will allow you to access the knowledge base and FAQs.
As you click through each of these categories, a dropdown with filters appears with the various functionality of each, depending on the tab that you are interacting with.